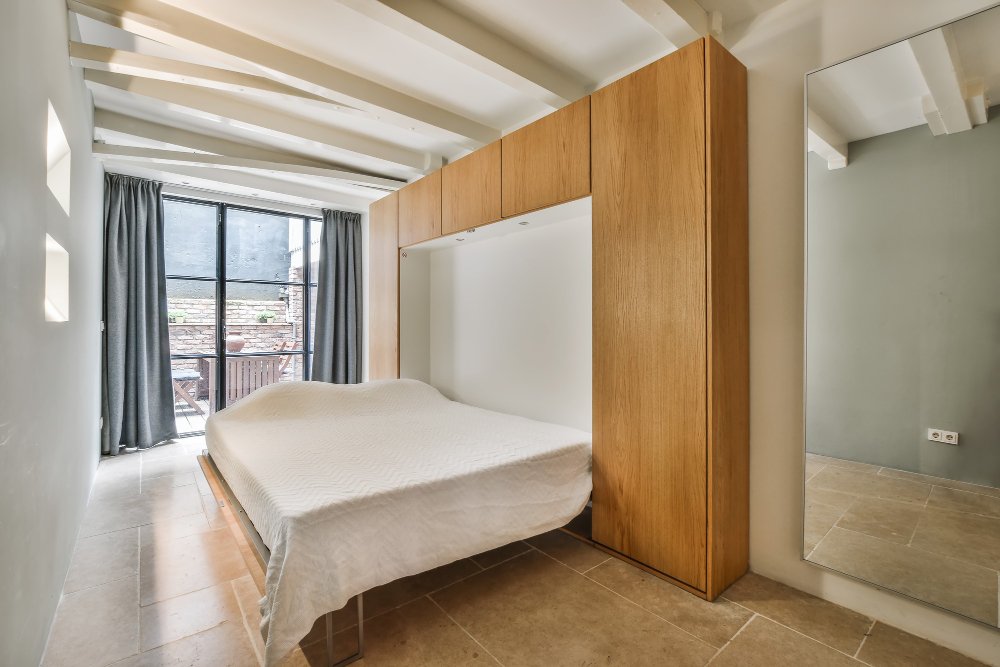
When you’re trying to make the most of limited space, few solutions are as efficient—or as sleek—as a custom Murphy bed. These modern marvels offer a way to transform any room into a multi-use space: an office by day, a guest room by night, and storage in between. But as with any major home upgrade, getting it right takes planning, precision, and an eye for structural integrity.
If you’re thinking of adding a wall bed to your home, this step-by-step guide will walk you through the process—from concept to murphy bed installation—the right way. Because when it comes to your home, it’s not just about saving space. It’s about safety, durability, and smart, lasting design.
Step 1: Choose the Right Location
Before you even open a catalog, assess your space. Ask:
Is this room truly suited for a built-in bed?
Does it have a strong enough wall to anchor a vertical bed system?
Will the bed block doors, windows, or vents when extended?
Tip from the jobsite: Always check for studs, HVAC vents, and electrical wiring in the wall where the bed will be mounted. You’ll need solid backing to anchor the system safely. If your wall can’t support the unit, you may need added reinforcement—this isn’t a corner you want to cut.

Step 2: Define Your Functionality Needs
Not all custom Murphy beds are built the same—and they shouldn’t be.
Start by asking yourself:
Is this for everyday use or occasional guests?
Do you need integrated storage beds, shelving, or a built-in desk?
Do you want vertical or horizontal orientation?
If you’re working with a home office guest room, you might want a model with dual-purpose furniture—something that folds over a workstation or includes overhead cabinets. If it’s for a studio or loft, a compact sleeping solution might make more sense.
Step 3: Choose Your Bed System and Mechanism
Next, you’ll decide on the actual mechanics of your retractable bed. There are typically two safe, reliable types:
Spring-lift systems – Easy to use and adjust over time.
Piston-lift systems – Sleeker, quieter, and more expensive.
Avoid cheap or DIY spring kits that aren’t tested for long-term use—especially if kids or seniors will be using the bed. Stick with a custom-built bed system that includes safety locks and a rated weight limit.

Step 4: Design and Customize for Your Space
Now for the fun part: designing a solution that fits your home and style.
Work with a contractor or designer to draft cabinetry that blends seamlessly into your room. Consider:
Matching custom cabinetry to existing built-ins
Integrating lighting into the underside of the bed
Adding USB outlets or bookshelves
Ensuring proper mattress fit (standard mattresses usually work, but check height limits)
This is where furniture integration really makes a difference. Done right, your hidden bed solution should feel like part of the home—not a bulky add-on.
Step 5: Prep for Installation
Before install day, clear the area completely. If possible:
Remove baseboards or crown molding where needed
Paint or patch the wall ahead of time
Confirm delivery measurements and entryway clearances
Ensure you have all hardware, anchors, and fasteners accounted for—especially if your Murphy bed installation is custom-built or part of a built-in sleeping system.
Step 6: Install With Safety First
This is where cutting corners causes problems. A fold-down bed involves precise measuring, heavy lifting, and anchoring into structural framing. If you’re not confident in your skill level, hire a pro.
For safe installation:
Use a level and laser measure to mark anchor points
Drill into studs or add blocking where needed
Use heavy-duty wall anchors or lag bolts
Follow manufacturer guidelines to the letter
Test the lift mechanism and safety locks thoroughly
Remember: a poorly installed Murphy bed isn’t just annoying—it’s dangerous. This is a job where “good enough” is not good enough.
Don’t wait!
Contact us now to schedule your consultation and discover how we can transform your kitchen into the heart of your home!
Step 7: Finish, Inspect, and Use
Once installed, double-check that:
The bed opens and closes smoothly
No screws or parts are loose
The frame is flush with the wall
All trim work and cabinetry is secure
Give it a few test runs. If anything feels unstable, go back and adjust. And if you’re using a space-saving furniture system in a child’s room or rental unit, be sure to post basic usage instructions to avoid damage or injury.
Final Word: Make It Right, Not Just Fast
A well-installed custom Murphy bed isn’t just a convenience—it’s a long-term solution that can transform how you use your home. But like any good renovation, it takes thought, prep, and a willingness to do the job right from the start.
So whether you’re tackling a shower install or building the perfect multi-use space, remember: shortcuts now mean problems later. Build smart. Build safe. And always build for the way you live.